


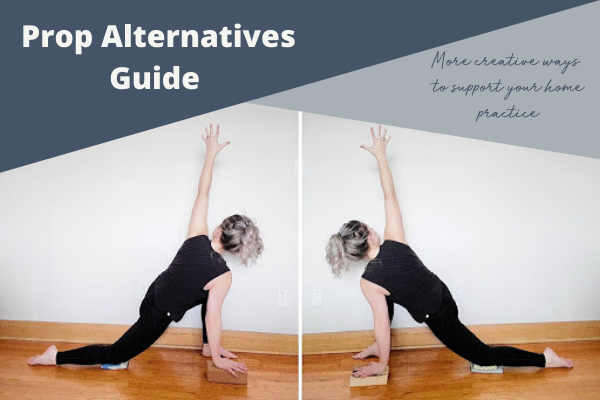
Yoga Props Alternative Guide Part 2
Get Creative To Support Your Home Yoga Practice
A lot can change in a week. We have all been affected by the current global pandemic. Maybe your regular wellness routine has been put to a halt, or you find yourself with spare time to try something new at home. Whatever your current situation may be, find a few moments to turn inwards, to feel your breath, feel your body, and calm your mind. Taking extra time to connect to yourself can be a great way to help settle the many emotions that might be rising to the surface during this difficult time. Yoga Instructor Kelsi Salisbury has again teamed up with Love My Mat to offer ways to support your yoga practice from the comfort of your own home.
Yoga Prop Alternative Guide:
Yoga Block → Book
You may need to play with the size of the book depending on what suits your body, and what suits the pose. Even stacking two books together could be an option!
Yoga Strap → Belt
If you don’t have a belt, a scarf or necktie might do the trick!
Knee Pillows → Folded Dish Cloths
You be the judge on how many will give your knees enough cushion to feel comfortable. Generally I would say a stack of 2-3 should do the trick.
Sandbag → Weighted Grocery Bag
Don’t have a Sandbag? Check out this quick fix from your pantry:
- Reusable Grocery Bag (preferably one that is not a slippery vinyl material)
- Weighted pantry item: (5kg bag of flour, 10lb bag of rice, a bag of onions, a LOT of wine gums)
Place your weighted pantry item whole in your reusable grocery bag, and tie it up (just to ensure there are no unnecessary spills!)
Bolster → Stacked Blankets or Pillows
Fold your blankets so they are about 8-12 inches wide and 24-28 inches long.
TIP: Denser blankets will feel more supportive.
LEGS UP THE WALL
Equipment: Bolster + Yoga Strap + Sandbag // Blanket Stack + Belt + Weighted Grocery Bag
This restorative yoga pose may be just what you need to reset. With legs up the wall, you assist the body’s circulatory mechanisms, using gravity to help boost fluid return from the feet and legs towards the core. In my case, it feels fantastic on my lower back, and helps my body relax so my mind can do the same. I love this pose after a long run, prior to meditation, or before bed.
TRY IT:
Find a clear space on your wall. Place your bolster/blanket stack about 6-8 inches from the wall to begin. Sit on the edge of your bolster/blanket stack with your knees tucked in, and your right shoulder towards the wall. Slowly drop your left forearm to the floor as you carefully swing your legs up the wall, eventually lying flat on your back with hips centered on your bolster/blanket stack. Your shoulders are grounded, the back of your head is heavy on the floor. You may need to adjust your bolster/blankets so they are under your lower back with your sitting bones rolling off the edge of the prop. You can also shimmy your upper body further away from the wall. Today you might hold this pose for 5 minutes, but with practice you might find staying longer becomes easier.
To exit the pose, bend your knees and walk your feet down the wall, roll on to either side and slowly press your body back upright.
ADD A LAYER (OR TWO):
- For some folks, it becomes hard to relax in this shape feeling as though the legs want to drift apart. Use a yoga strap/belt here to hold your thighs together as seen in this photo.
- Use a sandbag/weighted grocery bag to add resistance to the top of your feet. Have a friend or family member assist you in placing the item on the soles of your feet once you have found your desired shape.
TIP: Your hips do not need to be touching the wall! This will make the stretch more intense on hamstrings and less relaxing. Take the time to adjust your set up so you can fully relax!

FIRELOG POSE
Equipment: Yoga Block + Yoga Sandbag // Book + Weighted Grocery Bag
You may have heard your yoga instructor mention that ‘your hips can store a lot of emotion.’ In times of stress the hips could be a place in the body that collect and hold residual tension. Taking the time to stretch the hips can be a great physical release and may also feel both calming and healing. This intense outer hip stretch is best done after a workout, a walk, or towards the end of your yoga practice when your body is already warm. Be mindful of sensitive knees - sitting crossed legs is certainly a progression towards this pose.
TRY IT:
From a seated position, bend your right knee and cross your right foot under your left leg towards your sitting bone. Gently draw left and right toes up towards your shin bones. Bend at your left knee and use your hands to help cross your left ankle over your right knee. If your knees are feeling good you might gradually slide your right foot further forwards towards horizontal (I.e. parallel to the short edge of your mat, as if you were stacking one "firelog" on top of the other). Use your block/book to bridge the space between your right foot and left knee. Roll your shoulders down and away from your ears, your chest is open chest as the crown of your head reaches towards the ceiling. Press the outer edges of your feet down towards the earth and say hello to your outer hips!
Drape your sandbag/weighted grocery bag over your left knee to add more gravity to the equation. This will softy encourage more opening through the hips
Repeat crossing your legs the opposite way.
TIP: If your hips are tight, sit on a rolled up blanket or pillow to prop your hips up and reduce the intensity of the stretch.

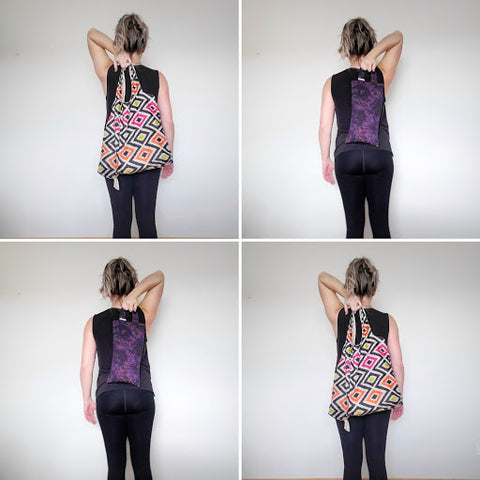
TRICEPS STRETCH
Equipment: Yoga Sandbag // Weighted Grocery Bag
This restorative pose primarily targets the triceps muscle on the back of your upper arm. The addition of your prop allows you to work with gravity rather than against it. The weight of your prop will encourage a gentle release in the back of the arm without requiring additional effort elsewhere in the body.
TRY IT:
It can be helpful to have a partner assist in handing you the sandbag/weighted grocery bag.
Stand tall as you raise your right arm overhead, palm facing forward. Rotate your palm inwards as you bend at your elbow to ‘give yourself a pat on the back.’ With your palm facing your back, grip the sandbag/weighted grocery bag in your right hand. Let the bag be heavy as you gently press the back of your head into your right forearm, maintaining a long spine.
When you’re ready to come out, find your friend to remove the weight, otherwise reach your other hand back to help pull the weight over your head by extending your elbows. Then slowly lower your prop in front of you.
Repeat on the opposite side.
TIP: Check in to see if you are arching your back and flaring your ribs. Could you draw your lower ribs closer to your pubic bone, to feel your abdominal muscles fire on? This small adjustment will help to maintain a long spine.
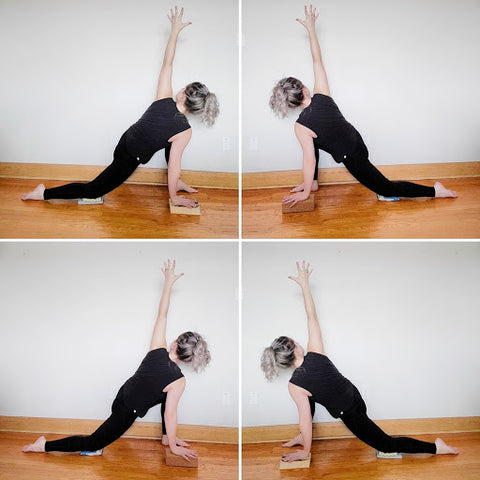
LOW LUNGE TWIST
Equipment: Block + Knee Pillow // Book + Folded Dish Cloths
I love lunge twists! Amongst other things, they target tight hip flexors and hamstrings, open rounded chests, start to engage back muscles and call on spinal mobility. They are an active pose requiring an element of balance and concentration. Twists themselves gently massage the digestive organs which may aid in digestive function.
TRY IT:
From a table position (on hands and knees with a flat back) slide a knee pillow or a few dish cloths under your left knee for added comfort. Step your right foot forward between your hands. Check that your front knee is stacked over your ankle. Take a deep inhale, and as you exhale, slowly sweep your right arm wide to open your chest towards the right side wall. Feel your right fingertips reach away from your body, to find lift rather than sinking into your left wrist and shoulder. Imagine your shoulder blades moving towards one another on your back.
Repeat on the opposite side.
TIP: Use a block/book to bring the floor to you! This will reduce stress on your body as your twist towards the side.
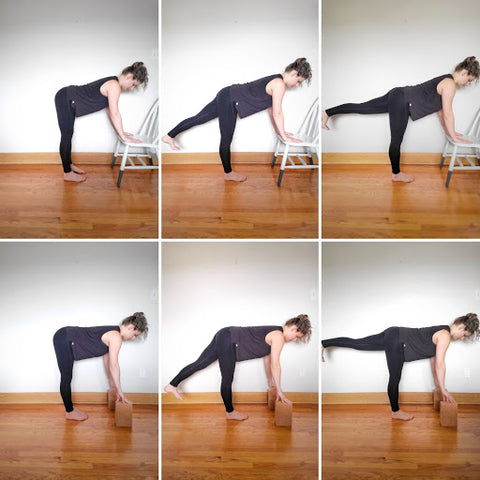
WARRIOR III
Equipment: Block // Sturdy Chair
Generally speaking, spending much of our time as a society in a seated position causes the muscles on the back of our bodies to become weak. Warrior III works to strengthen your hamstring and glutes, as well as the muscles of your back to keep your torso upright. This pose also taps into balance, and is a good option to work on pelvic stability.
TRY IT:
Hinge your upper body forward and place your hands to blocks or the seat of a chair. Feel your spine lengthen as the crown of your head reaches forward and your tailbone reaches back. Tuck your chin slightly towards your chest. Your collarbones stay broad by drawing your shoulder blades towards one another on your back. Transfer your weight into your right foot, grow strong in your right leg. Slowly kick your left heel back behind you, maintain a relatively straight leg, and squeeze your bum. Keep your toes facing down so your hips can be square to the ground, and imagine drawing your right hip back and left hip forwards. Move just as slow to lower your lifted leg. Rather than working with momentum, can you use your muscles to raise and lower your leg? Can your blocks/chair be there to help with balance rather than bearing all of your weight in your wrists?
Repeat on the opposite leg.
TIP: Place the back of your chair against the wall to ensure it doesn’t slip away from you!
Now more than ever you might be thinking about how you can incorporate yoga into your routine at home. Times like these often require us all to be a little bit more creative. Shelley and her team at Love My Mat are here to support you, creating yoga and meditation props that fit the pose to your unique body. If you ever have questions on how to make a pose more accommodating at home they are always here to chat!
Do you have other ideas of how to use household items to improve your at home yoga experience? Let us know how you are getting creative at home with your #PropAlternatives!
Disclaimer: Always consult your health care provider and obtain full medical clearance before practicing yoga or any other exercise program. Practicing under the direct supervision and guidance of a qualified instructor may reduce the risk of injuries. Not all yoga poses are suitable for all persons, listen to your body.
BIO:
Kelsi Salisbury
Kelsi is a yoga instructor, outdoor enthusiast, and chronic car singer. After a youth of playing sports, Kelsi followed her interest in health and wellness to Western University where she completed her degree in Kinesiology. Kelsi took her first yoga class in 2009, primarily turning to yoga as a supplementary form of movement and stretching to complement a distance running and resistance training regimen. In time, Kelsi found herself turning to yoga for more than a stretch, using time on her mat for awareness, clarity and self-acceptance. Learning how to apply these lessons outside of the yoga studio has been the most rewarding part of her practice.
Kelsi felt the desire to share the benefits of a mindful movement practice with others. In 2019, after years of thinking about it, she took the step to complete her 200-Hour Yoga Teacher Training at In Fine Feather Yoga. Kelsi encourages exploratory movement with mindfulness at the forefront, sharing in the humanness of becoming better listeners to our own bodies and minds as we move about our lives. If not at the yoga studio you might find Kelsi running on a trail, paddleboarding at a conservation area, getting lost in endless crafting, or tending to her vegetable garden.